C++ has always been a language revered for its flexibility, depth, and low-level power. It’s a language that enables a variety of programming styles and paradigms, from object-oriented to template meta-programming. One feature of C++ that perfectly encapsulates its versatile nature is variadic templates. Introduced in C++11, variadic templates extend the power of template programming to allow functions, classes, and structures to accept an arbitrary number of arguments in a type-safe way.
What are Variadic Templates?
Variadic templates in C++ are templates that can take an arbitrary number of arguments. They’re named “variadic” because the number of arguments can vary per invocation.
In the code above, Args is a template parameter pack, and args is a function parameter pack. The … is the pack expansion operator.
Using Variadic Templates
Let’s dive into some practical examples to get a better sense of how these templates work. Imagine we want to create a function print_all to print any number of arguments of any types. We could use variadic templates for this:
In the function print_all, the expression (std::cout << … << args) is a fold expression, a feature added in C++17. It’s equivalent to std::cout << arg1 << arg2 << arg3 << ….
Advanced Use Case: Compile-time Summation
Variadic templates shine in compile-time computations. Let’s create a function that calculates the sum of all arguments at compile time:
This function uses a fold expression to add all arguments together. Here’s how we could use it:
constexprauto result =sum(1,2,3,4,5);std::cout << result <<'\n'; // Prints: 15
The sum function accepts any number of arguments and sums them up. Note the use of constexpr which makes the function usable in compile-time contexts.
Conclusion
Variadic templates, just like many other C++ features, are a powerful tool that gives programmers a lot of flexibility. They open up a world of possibilities for writing generic, reusable, and type-safe code. With the power of variadic templates, you can create functions and classes that can accept any number of arguments of any types.
As with any powerful tool, however, variadic templates should be used judiciously. They make code more complex and harder to understand, and they should only be used when necessary. When used correctly, they can greatly improve the expressiveness and reusability of your C++ code.
The journey to mastering variadic templates in C++ is as fascinating as it is rewarding, offering a glimpse into the depth and versatility of the language. Happy coding!
Monitoring replication lag in a Kafka cluster is crucial in order to ensure data availability and durability. Replication lag occurs when the replicas of a partition are not in sync with the leader, which can occur due to network delays or a slow follower.
When replication lag happens, it means that the follower replicas are not able to keep up with the writes being made to the leader. This can cause the replicas to fall behind the leader, which can result in data loss if the leader broker fails before the replicas have caught up. Furthermore, it can also cause inconsistencies in the data stored on the replicas, which can lead to issues when the replicas are promoted to the leader.
There are several causes of replication lag:
Network Latency: If the network between the leader and the replicas is slow or unreliable, it can cause replication lag. This can happen if there are high levels of network congestion or if the network is not configured correctly.
Disk I/O: If the replica’s disk I/O is slow or saturated, it can cause replication lag. This can happen if the replica is running on a slow or overloaded disk, or if the replica is running on a machine with limited resources.
CPU Utilization: If the replica’s CPU is overutilized, it can cause replication lag. This can happen if the replica is running on a machine with limited resources or if the replica is running other processes that are consuming CPU resources.
Memory Pressure: If the replica is running low on memory, it can cause replication lag. This can happen if the replica is running on a machine with limited resources, or if the replica is running other processes that are consuming memory resources.
To monitor replication lag, one can use kafka-consumer-groups command and check the lag for each partition and replica. The lag is the number of messages the replica is behind the leader. Monitoring replication lag regularly is important to detect and resolve issues as soon as they arise.
To mitigate the replication lag, one can:
Increase the resources available to the replicas such as CPU, Memory and disk I/O
Optimize the network between the leader and replicas
Tune the replication factor and consistency guarantees
Use auto-failover mechanism which automatically elect a new leader for a partition when the current leader goes down.
In summary, replication lag is an important aspect to monitor in a Kafka cluster. It can impact the availability and durability of the data stored in the system. Monitoring replication lag regularly is important to detect and resolve issues as soon as they arise. And there are several ways to mitigate it.
Auto-failover mechanism
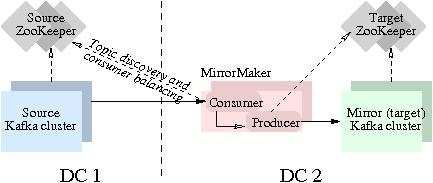
An example of an automatic failover mechanism is the Kafka MirrorMaker tool provided by Apache Kafka. This tool is designed to create a replica of a source Kafka cluster on a target Kafka cluster. In the event of a broker failure on the source cluster, MirrorMaker can automatically promote one of the replicas on the target cluster to be the leader for the affected partitions.
This allows the target cluster to continue servicing read and write requests, even if the leader on the source cluster goes down. This not only provides high availability but also minimizes data loss, as clients don’t need to be aware of the leader change.
Here is sample configuration example for MirrorMaker
# list of brokers in the source kafka clustersource.brokers=192.168.1.100:9092,192.168.1.101:9092,192.168.1.102:9092# list of brokers in the target kafka clustertarget.brokers=192.168.2.100:9092,192.168.2.101:9092,192.168.2.102:9092# list of topics to be mirroredtopics=topic1,topic2,topic3# number of threads to use for mirroringnum.streams=3# replication factor for mirrored topics on the target clustertarget.replication.factor=3# enable automatic failoverauto.failover.enabled=true# time interval to check for broker failuresauto.failover.interval.ms=10000
Confluent’s Kafka-clients library
Another example of automatic failover is Confluent’s Kafka-clients library. This library provides an automatic failover feature for Kafka consumers. In case a consumer loses its connection to the leader broker, the library will automatically try to reconnect to another broker that has the same partition, allowing the consumer to continue reading data from the partition, even if the leader broker goes down.
First, you would include Confluent’s Kafka-clients library in your project by adding the appropriate dependency to your build file (e.g. pom.xml for Maven, build.gradle for Gradle). For example:
2. Next, you would create a Kafka consumer object by instantiating the KafkaConsumer class and providing the appropriate configuration, such as the list of brokers to connect to, the group ID, and the list of topics to consume.
3. You would then set the enable.auto.commit property to true and to “enable” the automatic failover feature you should set the property reconnect.backoff.ms to a non-zero value, this will cause the consumer to periodically attempt to reconnect to the cluster and it will automatically failover to a new broker if the current broker goes down:
4. You can then subscribe to the topics you want to consume from and poll for new messages using the poll() method.
consumer.subscribe(Arrays.asList("topic1","topic2","topic3"));while(true){ConsumerRecords<String,String>records=consumer.poll(Duration.ofMillis(100));for(ConsumerRecord<String,String>record: records){// process the record}}
5. If a broker goes down, the library will automatically try to reconnect to another broker that has the same partition, allowing the consumer to continue reading data from the partition, even if the leader broker goes down.
Additionally, you may want to set some configuration properties like session.timeout.ms, max.poll.interval.ms and heartbeat.interval.ms to ensure that the consumer can detect a broker failure in a timely manner and to prevent it from being kicked out of the group because of being considered as dead.
In summary, automatic failover mechanisms are designed to ensure high availability and minimize data loss by automatically electing a new leader for a partition when the current leader goes down. These mechanisms can be implemented through tools such as Kafka MirrorMaker or libraries such as Confluent’s Kafka-clients.
While browsing my old hard disk I found this nice peace of code. This C code can start from the boot sector and print Hello World. No dependency is used, it is using its own printf implementation.
// Copyright (C) 2008 Michal Drozd// All Rights Reserved// Very simple "operating system" in C which after booting show "Hello World" on display, with its own printf implementation!// KEEP IN MIND, you can NOT just compile it in standard way as standard program as there is no OS when this program is started, so "PE header" won't be recognised of course, etc.// Raw compiled code must be placed to boot sector to run it.// How to build this:// nasm -f bin -o boot.bin boot.asm// gcc -m32 -nostdlib -nostdinc -fno-builtin -fno-stack-protector -nostartfiles -nodefaultlibs -Wall -Wextra -Werror -c hello_world_os.c// ld -m elf_i386 --oformat binary -Ttext 0x7c00 --o hello_world_os.bin hello_world_os.o// cat boot.bin c_code.bin > os.img// qemu-system-i386 os.img#include<stdint.h>#include<stddef.h>#include<stdarg.h>// This function depends on architecture a lot of course!voidbios_video_print_char(charc){ auto *video_memory =(uint8_t*)0xB8000;staticuint8_t x =0;staticuint8_t y =0;switch(c){case'\n':{ x =0; y++;break;}default:{ video_memory[2*(80* y + x)]= c; video_memory[2*(80* y + x)+1]=0x07; // white on black text x++;if(x >=80){ x =0; y++;}break;}}if(y >=25){for(y =0; y <24; y++){for(x =0; x <80; x++){ video_memory[2*(80* y + x)]= video_memory[2*((80* y +1)+ x)]; video_memory[2*((80* y +1)+ x)]=0x07; // white on black text}}for(x =0; x <80; x++){ video_memory[2*((80*24)+ x)]=''; video_memory[2*((80*24)+ x)+1]=0x07; // white on black text} y =24;}}voidprint(constchar*str){while(*str){bios_video_print_char(*str); str++;}}voidprint_hex(uint32_tnum){char hex[]="0123456789ABCDEF";for(int i =28; i >=0; i -=4){bios_video_print_char(hex[(num >> i)&0xF]);}}voidprint_dec(uint32_tnum){if(num <10){bios_video_print_char(num +'0');}else{print_dec(num /10);bios_video_print_char(num %10+'0');}}voidprintf(constchar*format,...){ va_list args;va_start(args, format);while(*format !='\0'){if(*format =='%'){ format++;switch(*format){case'c':{char c =va_arg(args,int);bios_video_print_char(c);break;}case's':{char* str =va_arg(args,char*);print(str);break;}case'd':{int32_t num =va_arg(args,int32_t);if(num <0){bios_video_print_char('-'); num =-num;}print_dec(num);break;}case'x':{uint32_t num =va_arg(args,uint32_t);print("0x");print_hex(num);break;}}}else{bios_video_print_char(*format);} format++;}va_end(args);}// This is very HW specific, need to adjust for your HW!voidbios_video_set_mode(uint8_tmode){asmvolatile("int $0x10"::"a"(0x00), "b"(mode));}// Boot entry point!voidmain(){bios_video_set_mode(0x03);printf("Hello world!\n");printf("%d\n",-123);printf("%x\n",0x12345678);for(;;){}}
Now that we have successfully developed the popular Rock-Paper-Scissors game for the TRON blockchain, let’s take on a new challenge and create an action-packed game – Zombie Survival.
ZombieSurvival is a smart contract game built on the TRON blockchain using the Solidity programming language. The game simulates a zombie apocalypse where each player is a survivor, and they can join the game, shoot zombies, acquire score, and acquire items and weapons to improve their chances of survival. Each player has an owner, health, ammo, and score. The contract has several functions that allow players to join the game, shoot zombies, acquire items, upgrade weapons, complete quests and more.
When a player joins the game, they are added to the mapping “players” as a struct Player with a default health, ammo and score. The player can then use the “shoot” function to try and hit the zombies, this function will check if the player’s health and ammo are greater than 0 and it will use the function “checkHit” to determine if the player hit the zombies or not. If the player hit the zombies, the player’s health will decrease by 10, if the player’s health reaches 0, the player’s stats will be reset.
The contract also has functions to acquire items, upgrade weapons, complete quests and trade with other players. The player can use the “acquireItem” function to purchase items using their score. The player can use the “upgradeWeapon” function to upgrade their weapon using their score. The player can use the “completeQuest” function to complete quests and earn rewards. The player can use the “trade” function to trade with other players using items.
The contract also emits events when a player shoots, when a player’s health changes and when a player’s score changes.
pragmasolidity ^0.4.24;contract ZombieSurvival {//Struct to hold the information of a playerstruct Player {address owner;uint health;uint ammo;uint score;mapping(string=>uint) inventory;mapping(string=>uint) upgrades;}//Mapping to hold all the playersmapping(address=> Player)public players;//Event to be emitted when player shoots a zombiesevent Shoot(addressshooter);//Event to be emitted when player's health changesevent HealthChanged(addressplayer, uintnewHealth);//Event to be emitted when player's score changesevent ScoreChanged(addressplayer, uintnewScore);//Function to join the gamefunctionjoinGame()public{require(players[msg.sender].owner ==address(0)); players[msg.sender].owner =msg.sender; players[msg.sender].health =100; players[msg.sender].ammo =20; players[msg.sender].score =0;}//Function to shoot a zombiesfunctionshoot()public{require(players[msg.sender].health >0);require(players[msg.sender].ammo >0);//decrement ammo players[msg.sender].ammo--;//increment score players[msg.sender].score++;//check if the player hit a zombiesif(checkHit()){//decrement health players[msg.sender].health -=10;emitHealthChanged(msg.sender, players[msg.sender].health);checkDeath();}emitScoreChanged(msg.sender, players[msg.sender].score);emitShoot(msg.sender);}//Function to acquire an itemfunctionacquireItem(string_itemName)public{require(players[msg.sender].score >=getItemCost(_itemName));require(players[msg.sender].inventory[_itemName]==0); players[msg.sender].score -=getItemCost(_itemName); players[msg.sender].inventory[_itemName]++;}//Function to upgrade a weaponfunctionupgradeWeapon(string_weaponName)public{require(players[msg.sender].score >=getWeaponUpgradeCost(_weaponName));uint currentLevel =getWeaponLevel(msg.sender, _weaponName);require(currentLevel !=0);require(currentLevel < maxWeaponLevel); players[msg.sender].score -=getWeaponUpgradeCost(_weaponName); players[msg.sender].upgrades[_weaponName]++;}//Function to complete a questfunctioncompleteQuest(string_questName)public{require(players[msg.sender].health >0);require(players[msg.sender].ammo >0);//check if the player completed the questif(checkQuestCompletion(_questName)){//increment score players[msg.sender].score +=getQuestReward(_questName);//increment health players[msg.sender].health +=getQuestHealthReward(_questName);//increment ammo players[msg.sender].ammo +=getQuestAmmoReward(_questName);}}//Function to buy TRX from the shopfunctionbuyTRX(uint_amount)public{require(msg.sender.transfer(_amount));}//Function to sell TRX to the shopfunctionsellTRX(uint_amount)publicpayable{require(msg.value == _amount);}//Function to check if the player completed a questfunctioncheckQuestCompletion(string_questName)privateviewreturns(bool){uint random =uint(keccak256(abi.encodePacked(block.timestamp,block.difficulty))) % 2;if(random ==1)returntrue;elsereturnfalse;}//Function to get the cost of an itemfunctiongetItemCost(string_itemName)publicviewreturns(uint){if(_itemName =="medkit")return1000;if(_itemName =="ammo_box")return5000;if(_itemName =="first_aid_kit")return10000;}//Function to get the cost of upgrading a weaponfunctiongetWeaponUpgradeCost(string_weaponName)publicviewreturns(uint){if(_weaponName =="pistol")return500;if(_weaponName =="shotgun")return2500;if(_weaponName =="rifle")return5000;}//Function to get the reward of a questfunctiongetQuestReward(string_questName)publicviewreturns(uint){if(_questName =="survival")return100;if(_questName =="zombie_hunt")return250;if(_questName =="rescue_mission")return500;}//Function to get the health reward of a questfunctiongetQuestHealthReward(string_questName)publicviewreturns(uint){if(_questName =="survival")return10;if(_questName =="zombie_hunt")return25;if(_questName =="rescue_mission")return50;}//Function to get the ammo reward of a questfunctiongetQuestAmmoReward(string_questName)publicviewreturns(uint){if(_questName =="survival")return5;if(_questName =="zombie_hunt")return10;if(_questName =="rescue_mission")return20;}//Function to get the current level of a weaponfunctiongetWeaponLevel(address_owner,string_weaponName)publicviewreturns(uint){return players[_owner].upgrades[_weaponName];}//Function to login and get a daily rewardfunctionlogin()public{require(players[msg.sender].health >0);require(players[msg.sender].ammo >0);//increment score players[msg.sender].score +=10;//increment health players[msg.sender].health +=5;//increment ammo players[msg.sender].ammo +=2;}//Function to save the game progressfunctionsaveProgress()public{//Save the player's data to storage or IPFS}//Function to load the game progressfunctionloadProgress()publicviewreturns(bool){//Load the player's data from storage or IPFS//if the data is successfully loaded return true, else return false}//Function to trade with another playerfunctiontrade(address_otherPlayer,string_itemName,uint_amount)public{require(players[msg.sender].inventory[_itemName]>= _amount);require(players[_otherPlayer].inventory[_itemName]>= _amount); players[msg.sender].inventory[_itemName]-= _amount; players[_otherPlayer].inventory[_itemName]+= _amount;}}
Let’s build a game using TRON, and what better game to create than rock-paper-scissors? We’ve already covered TRON, so now it’s time to put that knowledge into practice.
pragmasolidity ^0.4.24;contract Kingdoms {// Struct to hold the information of a Kingdomstruct Kingdom {address owner;uint army;uint gold;uint resources;mapping(string=>uint) structures;}// Mapping to hold all the Kingdomsmapping(address=> Kingdom)public kingdoms;// Event to be emitted on attackevent Attack(addressattacker, addressdefender, boolsuccess);//Event to be emitted on structure buildingevent Build(addressowner, stringstructureName);// Function to create a new KingdomfunctioncreateKingdom(uintinitialArmy,uintinitialGold,uintinitialResources)public{require(kingdoms[msg.sender].owner ==address(0)); kingdoms[msg.sender].owner =msg.sender; kingdoms[msg.sender].army = initialArmy; kingdoms[msg.sender].gold = initialGold; kingdoms[msg.sender].resources = initialResources;}// Function to attack another Kingdomfunctionattack(address_defender)public{require(kingdoms[msg.sender].army >0);require(kingdoms[_defender].owner !=address(0));//calculate the success of the attackbool success =calculateAttack(kingdoms[msg.sender].army, kingdoms[_defender].army);if(success){ kingdoms[_defender].army = kingdoms[_defender].army /2; kingdoms[msg.sender].gold += kingdoms[_defender].gold; kingdoms[msg.sender].resources += kingdoms[_defender].resources;}else{ kingdoms[msg.sender].army = kingdoms[msg.sender].army /2;}emitAttack(msg.sender, _defender, success);}// Function to build structures in a KingdomfunctionbuildStructure(string_structureName)public{require(kingdoms[msg.sender].gold >=getStructureCost(_structureName));require(getStructureLevel(msg.sender, _structureName)==0); kingdoms[msg.sender].gold -=getStructureCost(_structureName); kingdoms[msg.sender].structures[_structureName]=1;emitBuild(msg.sender, _structureName);}// Function to upgrade a structure in a KingdomfunctionupgradeStructure(string_structureName)public{require(kingdoms[msg.sender].gold >=getStructureUpgradeCost(_structureName));uint currentLevel =getStructureLevel(msg.sender, _structureName);require(currentLevel !=0);require(currentLevel < maxStructureLevel); kingdoms[msg.sender].gold -=getStructureUpgradeCost(_structureName); kingdoms[msg.sender].structures[_structureName]++;}// Function to get the current level of a structure in a KingdomfunctiongetStructureLevel(address_owner,string_structureName)publicviewreturns(uint){return kingdoms[_owner].structures[_structureName];}// Function to get the cost of building a structurefunctiongetStructureCost(string_structureName)publicviewreturns(uint){if(_structureName =="wall")return1000;if(_structureName =="tower")return5000;if(_structureName =="barracks")return10000;}// Function to get the cost of upgrading a structurefunctiongetStructureUpgradeCost(string_structureName)publicviewreturns(uint){if(_structureName =="wall")return500;if(_structureName =="tower")return2500;if(_structureName =="barracks")return5000;}// Function to calculate the success of the attackfunctioncalculateAttack(uintattackerArmy,uintdefenderArmy)privateviewreturns(bool){uint random =uint(keccak256(abi.encodePacked(block.timestamp,block.difficulty))) % 2;if(random ==1&& attackerArmy > defenderArmy)returntrue;elsereturnfalse;}}
The smart contract allows players to create new kingdoms, attack other players, and acquire resources and gold and build structures.
The new feature allows players to build and upgrade structures in their kingdom. Structures can be walls, towers, or barracks. The function buildStructure allows a player to build a new structure, it checks if the player has enough gold and if the structure doesn’t exist in the player’s kingdom. When a player builds a new structure, the gold is subtracted from the player’s kingdom and the structure is added to the kingdom with level 1.
The function upgradeStructure allows players to upgrade an existing structure, it checks if the player has enough gold, if the structure exist and if the structure is not at the max level. Upgrading a structure will increase the level of the structure and the gold will be subtracted from the player’s kingdom.
The function getStructureLevel allows players to check the current level of a structure in their kingdom. The function getStructureCost and getStructureUpgradeCost allows players to check the cost of building or upgrading a structure.
The smart contract also includes events that are emitted when a player builds or upgrades a structure, the event includes the player’s address and the name of the structure.
Let’s build a game using EOS, and what better game to create than rock-paper-scissors? We’ve already covered EOS in a previous example, so now it’s time to put that knowledge into practice.
// rock-paper-scissors game in EOS#include<eosiolib/eosio.hpp>#include<eosiolib/print.hpp>usingnamespace eosio;classrps:public contract {public:using contract::contract;[[eosio::action]]voidplay(name player1, name player2, std::string choice1, std::string choice2){require_auth(player1);require_auth(player2);eosio_assert(choice1 =="rock"|| choice1 =="paper"|| choice1 =="scissors","Invalid choice1");eosio_assert(choice2 =="rock"|| choice2 =="paper"|| choice2 =="scissors","Invalid choice2"); game_index games(_self,_self.value);games.emplace(player1,[&](auto&g){g.key=games.available_primary_key();g.player1= player1;g.player2= player2;g.choice1= choice1;g.choice2= choice2;});}[[eosio::action]]voidreveal(uint64_tkey){ game_index games(_self,_self.value);auto itr =games.find(key);eosio_assert(itr !=games.end(),"Game not found"); name p1 =itr->player1; name p2 =itr->player2;require_auth(p1);require_auth(p2);endgame(itr);}private:struct[[eosio::table]] game {uint64_t key; name player1; name player2; std::string choice1; std::string choice2;uint64_tprimary_key()const{return key;}};typedef eosio::multi_index<"games"_n, game> game_index;voidendgame(game_index::const_iterator itr){ name winner; std::string choice1 =itr->choice1; std::string choice2 =itr->choice2;if(choice1 == choice2){ winner ="tie"_n;}elseif(choice1 =="rock"&& choice2 =="scissors"|| choice1 =="paper"&& choice2 =="rock"|| choice1 =="scissors"&& choice2 =="paper"){ winner =itr->player1;}else{ winner =itr->player2;}print("Winner: ", winner);}};EOSIO_DISPATCH(rps,(play)(reveal))
The contract allows players to play the game by specifying their choices of rock, paper, or scissors. The game is saved in a multi-index table, and the players can reveal the result by providing the game’s key. The contract includes two actions: play and reveal.
The play action is used to save the game with player1, player2, choice1, choice2.
The reveal action is used to reveal the game result, it requires the key of the game and the auth of player1 and player2.
The game struct is used to save the game details, it includes the primary key, player1, player2, choice1, and choice2.
The endgame function is used to reveal the game result and it takes a const reference to the game struct.
EOS is a blockchain platform that was created to support the development and execution of decentralized applications (dApps). It uses a Delegated Proof of Stake (DPoS) consensus algorithm, which allows for high scalability and fast transaction processing.
EOS has its own native cryptocurrency called EOS tokens, which are used to pay for resources such as network bandwidth and storage on the EOS blockchain. The EOS platform also includes a web assembly (WASM) virtual machine, which allows for the execution of smart contracts written in multiple programming languages.
One of the key features of EOS is its ability to handle a high number of transactions per second (TPS). While most blockchain platforms are limited to a few TPS, EOS is designed to handle millions of TPS. This is achieved through a combination of a highly efficient consensus algorithm and a unique system of resource allocation.
Another key feature of EOS is its governance structure. The EOS community elects 21 block producers (BPs) through a voting process, who are responsible for maintaining the network and producing new blocks. These BPs are incentivized to act in the best interest of the community, as they are rewarded with EOS tokens for their contributions to the network.
Smart Contracts
EOS smart contracts are written in web assembly (WASM) and can be written in multiple programming languages such as C++, Rust and others.
EOS smart contracts are similar to those on other blockchain platforms, such as Ethereum, in that they allow for the execution of complex logic and the creation of decentralized applications (dApps). However, EOS smart contracts have some unique features that set them apart from other platforms.
One of the key features of EOS smart contracts is their ability to use a “parallel processing” model. This means that multiple smart contracts can be executed simultaneously, which increases the overall speed and efficiency of the network.
Another key feature of EOS smart contracts is the ability to use a “multi-threading” model. This means that a single smart contract can be executed by multiple threads, which increases the overall performance and scalability of the network.
EOS smart contracts also have the ability to access and use the resources of the EOS blockchain, such as network bandwidth and storage. This is achieved through a unique system of resource allocation, where the developer must hold a certain amount of EOS tokens to access and use these resources.
There are also other features such as token creation, peer-to-peer transactions, and more…
Example: token.cpp
#include<eosio/eosio.hpp>usingnamespace eosio;CONTRACT token: public contract {public:using contract::contract;ACTION create(name issuer, asset maximum_supply);ACTION issue(name to, asset quantity, string memo);ACTION transfer(name from, name to, asset quantity, string memo);private:TABLE account{ asset balance;uint64_tprimary_key()const{returnbalance.symbol.code().raw();}};TABLE currency_stats{ asset supply; asset max_supply; name issuer;uint64_tprimary_key()const{returnsupply.symbol.code().raw();}};typedef eosio::multi_index<"accounts"_n, account> accounts;typedef eosio::multi_index<"stat"_n, currency_stats> stats;voidsub_balance(name owner, asset value);voidadd_balance(name owner, asset value, name ram_payer);};ACTION token::create(name issuer, asset maximum_supply){require_auth(issuer);auto sym =maximum_supply.symbol; eosio::check(sym.is_valid(),"invalid symbol name"); eosio::check(maximum_supply.is_valid(),"invalid supply"); eosio::check(maximum_supply.amount>0,"max-supply must be positive"); stats statstable(get_self(),sym.code().raw());auto existing =statstable.find(sym.code().raw()); eosio::check(existing ==statstable.end(),"token with symbol already exists");statstable.emplace(issuer,[&](auto&s){s.supply= asset{0, sym };s.max_supply= maximum_supply;s.issuer= issuer;});}ACTION token::issue(name to, asset quantity, string memo){auto sym =quantity.symbol; eosio::check(sym.is_valid(),"invalid symbol name"); eosio::check(memo.size()<=256,"memo has more than 256 bytes"); stats statstable(get_self(),sym.code().raw());auto existing =statstable.find(sym.code().raw()); eosio::check(existing !=statstable.end(),"token with symbol does not exist, create token before issue");constauto& st =*existing;require_auth(st.issuer); eosio::check(quantity.is_valid(),"invalid quantity"); eosio::check(quantity.amount>0,"must issue positive quantity"); eosio::check(quantity.symbol==st.supply.symbol,"symbol precision mismatch"); eosio::check(quantity.amount<=st.max_supply.amount-st.supply.amount,"quantity exceeds available supply");statstable.modify(st, same_payer,[&](auto&s){s.supply+= quantity;});add_balance(to, quantity,st.issuer);}ACTION token::transfer(name from, name to, asset quantity, string memo){ eosio::check(from != to,"cannot transfer to self");require_auth(from); eosio::check(is_account(to),"to account does not exist");auto sym =quantity.symbol.code(); stats statstable(get_self(),sym.raw());constauto& st =statstable.get(sym.raw());require_recipient(from);require_recipient(to); eosio::check(quantity.is_valid(),"invalid quantity"); eosio::check(quantity.amount>0,"must transfer positive quantity"); eosio::check(quantity.symbol==st.supply.symbol,"symbol precision mismatch"); eosio::check(memo.size()<=256,"memo has more than 256 bytes");sub_balance(from, quantity);add_balance(to, quantity, from);}void token::sub_balance(name owner, asset value){ accounts from_acnts(get_self(),owner.value);constauto& from =from_acnts.get(value.symbol.code().raw(),"no balance object found"); eosio::check(from.balance.amount>=value.amount,"overdrawn balance");from_acnts.modify(from, owner,[&](auto&a){a.balance-= value;});}void token::add_balance(name owner, asset value, name ram_payer){ accounts to_acnts(get_self(),owner.value);auto to =to_acnts.find(value.symbol.code().raw());if(to ==to_acnts.end()){to_acnts.emplace(ram_payer,[&](auto&a){a.balance= value;});}else{to_acnts.modify(to, same_payer,[&](auto&a){a.balance+= value;});}}
This contract is a template for creating, issuing, and transferring a custom ERC-20-like token on the EOS blockchain.
It inherits from the contract class provided by the EOSIO library, which allows it to interact with the EOS blockchain.
The contract defines three actions:
create: allows the issuer to create a new token with a specified maximum supply.
issue: allows the issuer to issue a certain amount of the token to a specified recipient.
transfer: allows a user to transfer a certain amount of the token to another user.
It also defines two tables:
account: stores the balance of each user for a specific token.
currency_stats: stores the overall supply, maximum supply, and issuer of the token.
And helper functions:
sub_balance: subtracts a certain amount of the token from a user’s balance.
add_balance: adds a certain amount of the token to a user’s balance.
Overall, this contract provides the basic functionality for creating and managing a custom token on the EOS blockchain, and can be adapted to the specific requirements of a given application.
Do you want to get notified when someone mentions you in Microsoft Teams? Mainly when you can miss it if you focus on something else!
First, turn on live captions in MS Teams.
Then, just type the following in the Javascript console in your browser
// Select the div element to be monitored// This div may change later, so use devtools inspector to find DIV which wrapps all captionsvardiv=document.querySelector('div[data-tid="closed-captions-renderer"]');// Variable to keep track of the last time the alert was shownvarlastAlertTime=0;// Set an interval to check the contents of the div every 500 millisecondssetInterval(function(){// Get the current timevarcurrentTime=Date.now();// Get the contents of the divvardivContent=div.textContent;// Check if the div contains either "Michal" or "Michael"if (divContent.includes("Michal") ||divContent.includes("Michael")) {// Check if more than 5 seconds have passed since the last alertif (currentTime-lastAlertTime>5000) {// If more than 5 seconds have passed, show the alert, or do whatever you like! But alert should make browser tab focused.alert("They are searching for you!");// Update the last alert timelastAlertTime=currentTime;}}},500);
Then you get a browser alert when someone mentions your name (Michal or Michael)
Cardano is a blockchain platform that uses a proof-of-stake consensus algorithm called Ouroboros. It is built using the Haskell programming language and is designed to be a more secure, flexible, and sustainable platform for the development and execution of smart contracts and decentralized applications (dapps).
One key feature of Cardano is its multi-layer architecture, which separates the settlement layer (where transactions are recorded) from the computation layer (where smart contracts are executed). This allows for greater flexibility and scalability, as changes to the computation layer can be made without affecting the settlement layer.
Another important aspect of Cardano is its use of formal verification, a method of mathematically proving the correctness of smart contract code. This helps to ensure the security and reliability of dapps built on the platform.
One example of a dapp built on Cardano is Plutus, a smart contract programming language that is specifically designed for the platform. Plutus allows for the creation of highly secure and reliable smart contracts, and also enables developers to write code that is more easily verifiable and less prone to errors.
Example: auction contract
Here is a practical smart contract in Plutus:
module Main whereimport Language.PlutusTximport Language.PlutusTx.Preludeimport Language.PlutusTx.BuiltinsdataAuction= Auction {itemName::String,itemDescription::String,startPrice::Integer,highestBid::Integer,highestBidder::Address}placeBid : Auction -> Integer ->(Boolean, Auction)placeBid auction bid =if bid > highestBid auction then(True, auction {highestBid= bid,highestBidder= txSender })else(False, auction)endAuction : Auction ->(Boolean, String)endAuction auction =if txSender == highestBidder auction then(True,"Auction sold to "++ show (highestBidder auction)++" for "++ show (highestBid auction))else(False,"Auction not ended")main :()->()main _ =let auction = Auction {itemName="My Item",itemDescription="This is a very nice item",startPrice=100,highestBid=0,highestBidder= Address "0x0"}in trace auction trace $ placeBid auction 150
This smart contract example is an auction contract, it defines a custom data type called “Auction” which has five fields, itemName, itemDescription, startPrice, highestBid, and highestBidder. It also defines two functions to interact with the auction, placeBid, endAuction.
The placeBid function allows a user to place a bid on an auction. It checks that the bid is greater than the current highest bid and if so, it updates the highest bid and highest bidder. It returns a tuple of Boolean and the updated auction. The boolean value is true if the bid is successfully placed, otherwise it is false.
The endAuction function allows the highest bidder to end the auction and it checks that the sender of the transaction is the highest bidder. If so, it returns a tuple of Boolean and a message indicating that the auction is sold to the highest bidder for the highest bid amount. Otherwise, it returns a tuple of Boolean and a message indicating that the auction is not ended.
The main function is the entry point of the contract, it creates a new auction, traces it, and traces the result of the placeBid function.
This smart contract defines a custom data type called “Campaign” which has five fields, campaignName, campaignDescription, targetFunding, currentFunding, and deadline. It also defines two functions to interact with the campaign, contribute, refund.
The contribute function allows a user to contribute to a campaign. It checks that the transaction timestamp is less than or equal to the campaign deadline and that the total funding after the contribution is less than or equal to the target funding. If the checks pass, it updates the current funding and returns a tuple of Boolean and the updated campaign. The boolean value is true if the contribution is successfully placed, otherwise it is false.
The refund function allows a contributor to get a refund if the campaign is not fully funded. It checks that the sender of the transaction is the contributor and that the current funding is less than the target funding. If the checks pass, it returns a tuple of Boolean and the current funding. Otherwise, it returns a tuple of Boolean and 0.
The main function is the entry point of the contract, it creates a new campaign, traces it, and traces the result of the contribute function.
This smart contract example is an escrow service, it defines a custom data type called “Escrow” which has six fields, buyer, seller, arbitrator, item, amount and status. It also defines three functions to interact with the escrow create, release, refund and arbitrate.
The create function allows a user to create a new escrow transaction, it takes the buyer, seller and arbitrator addresses, an item name and the amount of the transaction, it creates an escrow object with the given data.
The release function allows the buyer to release the funds to the seller after they have received the item. It checks that the sender of the transaction is the buyer and that the status of the escrow is “created”, if so it updates the status of the escrow to “released” and returns a tuple of Boolean and the updated escrow. The boolean value is true if the release is successful, otherwise it is false.
The refund function allows the seller to refund the funds to the buyer if they have not received the item. It checks that the sender of the transaction is the seller and that the status of the escrow is “created”, if so it updates the status of the escrow to “refunded” and returns a tuple of Boolean and the updated escrow. The boolean value is true if the refund is successful, otherwise it is false.
The arbitrate function allows the arbitrator to resolve the escrow if there is a dispute between the buyer and the seller. It checks that the sender of the transaction is the arbitrator and that the status of the escrow is “created”, if so it updates the status of the escrow to “arbitrated” and returns a tuple of Boolean and the updated escrow. The boolean value is true if the arbitration is successful, otherwise it is false.
The main function is the entry point of the contract, it creates a new escrow, traces it, and traces the result of the release function.
Another example of a dapp built on cardano is Atala PRISM, which is a decentralized identity solution that allows individuals and organizations to have full control over their own digital identities.
A practical use case for Cardano is in the field of voting systems. A company called Agora is building a decentralized voting platform on Cardano that uses blockchain technology to ensure the security and transparency of the voting process. The platform allows for remote voting and eliminates the need for paper ballots, making the voting process more efficient and accessible.
Another example is in the field of charity and donation, a company called Giveth is building a platform that allows individuals to donate to charity organizations in a transparent and efficient way, by using smart contract to make sure the donation reach its intended target.
In summary, Cardano is a blockchain platform that uses a proof-of-stake consensus algorithm, is built using the Haskell programming language and designed to be more secure, flexible, and sustainable platform for the development and execution of smart contracts and decentralized applications (dapps). Its multi-layer architecture separates the settlement layer from the computation layer and uses formal verification as a method of mathematically proving the correctness of smart contract code.
This is just a high-level example, in a real-world scenario, you might want to use Kubernetes volumes to manage the data, add environment variables or configmaps to configure the application, or use Kubernetes autoscaling feature.
Additionally, you will also want to use a Kubernetes ingress to route the traffic to the correct service based on the URL path. This will allow your application to handle different routes and endpoints for the frontend and backend.
Finally, you can deploy the application to a Kubernetes cluster by applying the above configuration files using the kubectl command: